Hyundai Venue: Seat Electrical / Air Ventilation Seat. Repair procedures
Hyundai Venue (QX) (2020-2025) Service Manual / Body Electrical System / Seat Electrical / Air Ventilation Seat. Repair procedures
| Removal |
[Ventilation Blower]
| 1. |
Disconnect the negative (-) battery terminal.
|
| 2. |
Remove the front seat.
(Refer to Body - "Front Seat Assembly")
|
| 3. |
Remove the blower duct (A).
|

| 4. |
Remove the blower FAN (A) after removing the screws.
|

[Ventilation Seat Unit]
| 1. |
Disconnect the negative (-) battery terminal.
|
| 2. |
Remove the front seat.
(Refer to Body - "Front seat Assembly")
|
| 3. |
Remove the ventilation seat unit (A) after disconnect the connectors
(B).
|

| Installation |
[Ventilation Blower]
| 1. |
Install the blower fan.
|
| 2. |
Install the duct.
|
| 3. |
Install the front seat assembly.
|
| 4. |
Connect the negative (-) battery terminal.
|
[Ventilation Seat Unit]
| 1. |
Install the ventilation seat unit.
|
| 2. |
Install the front seat assembly.
|
| 3. |
Connect the negative (-) battery terminal.
|
| Inspection |
Ventilating seat consists of three units : the ventilating seat unit for control,
switch for input and and blower for output.
Diagnosis Mode
| 1. |
You can enter the diagnosis mode by turning the heater seat button on.
|
| 2. |
You can enter the diagnosis mode by referring to following description.
|
| 3. |
Press the heating wire switch as shown below.
|

| 4. |
When the vehicle enters the diagnostic mode, the three LEDs (Low, Mid,
High) in the heating wire section blinks once for 0.5 seconds.
|

| 5. |
After entering the diagnostic mode, check the LED status to identify
the error.
|


| 6. |
You can check the malfunctioning by checking the blinking LED.
|
| 7. |
The failure data is recorded to the memory by the ventilation seat unit.
|
| 8. |
Press the heating wire seat switch on the passenger side for 5 seconds
or more to make the LED blink four times and delete the failure data
in the memory.
|
| 9. |
Pressing the IGN OFF button will end the diagnosis mode for the heater
seat.
|
| 10. |
You can check whether the heating seat system works properly after turning
the IGN ON. If you want to check the error code, you can refer to the
procedure of 2 above.
|

 Lumber Support Units. Repair procedures
Removal
1.
Disconnect the negative (-) battery terminal.
2.
Remove the front seat assembly...
Other information:
Hyundai Venue (QX) (2020-2025) Service Manual: MDPS Motor. Repair procedures
Replacement 1. Turn the steering wheel so that the front wheels are placed in the straight ahead position. • If the steering wheel and the front tires are not set straight ahead together, it may affect the number of circulation of steering wheel and damage the cable inside the clock spring...
Hyundai Venue (QX) (2020-2025) Service Manual: Troubleshooting
Troubleshooting Problem Symptoms Table Use the table below to help you find the cause of theproblem. The numbers indicate the priority of the likecause of the problem. Check each part in order. If necessary, replace these parts...
Categories
- Manuals Home
- 1st Generation Venue Owners Manual
- 1st Generation Venue Service Manual
- Child-Protector Rear Door Locks
- Automatic Door Lock and Unlock Features
- System Setting and Activation
- New on site
- Most important about car
Smart Key
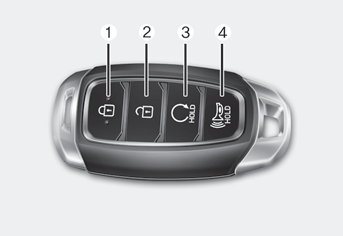
Your HYUNDAI uses a Smart Key, which you can use to lock or unlock the driver and passenger doors or the rear liftgate.
1. Door Lock
2. Door Unlock
3. Remote start

Copyright © 2025 www.hvenueqx.com