Hyundai Venue: Motor Driven Power Steering / MDPS Motor. Repair procedures
Hyundai Venue (QX) (2020-2025) Service Manual / Steering System / Motor Driven Power Steering / MDPS Motor. Repair procedures
| Replacement |
| 1. |
Turn the steering wheel so that the front wheels are placed in the straight
ahead position.
|

| 2. |
Turn the ignition switch OFF and disconnect the battery negative (-)
cable.
|

| 3. |
Remove the steering column shroud upper panel.
(Refer to Body - "Steering Column Shroud Upper Panel")
|
| 4. |
Remove the crash pad lower panel.
(Refer to Body - "Crash Pad")
|
| 5. |
Disconnect the MDPS ECU connectors (A).
|

| 6. |
Disconnect the ignition switch connector (A).
|

| 7. |
Remove the fixed clip (A) and then remove the wiring from the steering
column.
|

| 8. |
Loosen the mounting nut (A) and bolt (B) and leave the steering column
and EPS unit assembly lie on the vehicle's floor.
|


| 9. |
Remove the motor (A) by loosening the bolts.
|

| 10. |
Apply the grease at the new MDPS motor.
|


| 11. |
Install the MDPS motor.
|
| 12. |
Install in the reverser order of removal.
|
| 13. |
Conduct the "EPS Type Recognition" by Diagnostic tool.
(Refer to MDPS Motor - "Diagnosis with Diagnostic tool")
|
| 14. |
Conduct the "SAS Calibration" by diagnostic tool.
(Refer to MDPS Motor - "Diagnosis with Diagnostic tool")
|
| 15. |
Check the DTC.
|

| 16. |
Turn off the IGN switch and wait for 20 seconds or more. Then check
the operation after starting the engine.
|
| Diagnosis with Diagnostic tool |
| EPS Type Recognition |
|

EPS Type Recognition procedures
| 1. |
Connect self-diagnosis connector(16pins) located in the lower of driver
side crash pad to self-diagnosis device.
|
| 2. |
Turn the self-diagnosis device after key is ON.
|
| 3. |
Turn the steering wheel to straight ahead position.
|
| 4. |
After Selecting the "vehicle model" and "system", select the "EPS Type
Recognition" on diagnostic tool vehicle selection screen.
|


| 5. |
Remove the DTC.
|
| 6. |
Turn off the IG switch and wait for 20 seconds or more before starting
the engine. And then make sure that MDPS works properly.
SAS Calibration
|

SAS Calibration procedures
| 1. |
Connect self - diagnosis connector (16pins) located in the lower of
driver side crash pad to self - diagnosis device.
|
| 2. |
Turn the self - diagnosis device after key is ON.
|
| 3. |
Turn the steering wheel to straight ahead position.
|
| 4. |
After Selecting the "vehicle model" and "system", select the "SAS Calibration"
on diagnostic tool vehicle selection screen.
|


| 5. |
Remove the DTC.
|
| 6. |
Turn off the IG switch and wait for 10 seconds or more before starting
the engine. And then make sure that MDPS works properly.
|
 Repair procedures
A/S Repair produres
MDPS System A/S Workflow
① Noise / malfunction Inspection
② Warning lamp (DTC) / CAN Line error
2 - 1 Checking Connectors and Wiring
1...
 MDPS Control Unit. Repair procedures
Replacement
1.
Disconnect the battery negative cable from the battery and then wait
for at least 30 seconds.
2...
Other information:
Hyundai Venue (QX) (2020-2025) Service Manual: Description and operation
Description The charging system included a battery, an alternator with a built-in regulator, and the charging indicator light and wire. The Alternator has eight built-in diodes, each rectifying AC current to DC current. Therefore, DC current appears at alternator "B" terminal...
Hyundai Venue (QX) (2020-2025) Service Manual: Hood Latch Release Handle. Components and components location
..
Categories
- Manuals Home
- 1st Generation Venue Owners Manual
- 1st Generation Venue Service Manual
- Rear Combination Light Bulb Replacement
- Theft-Alarm System
- Child-Protector Rear Door Locks
- New on site
- Most important about car
Interior Overview
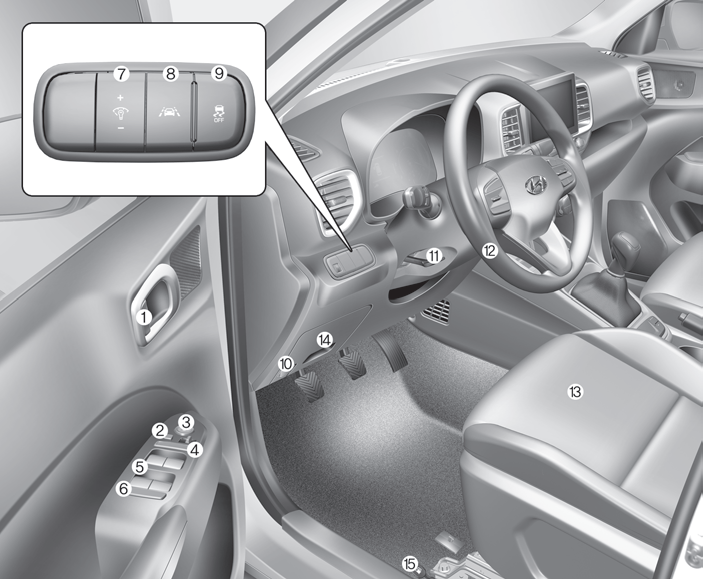
1. Door lock/unlock button
2. Outside rearview mirror control switch
3. Central door lock switch
4. Power window switches
5. Power window lock switch

Copyright © 2025 www.hvenueqx.com