Hyundai Venue: Passenger Airbag (PAB) Module / Side Airbag (SAB) Module. Repair procedures
Hyundai Venue (QX) (2020-2025) Service Manual / Restraint / Passenger Airbag (PAB) Module / Side Airbag (SAB) Module. Repair procedures
| Removal |
| 1. |
Disconnect the battery negative cable and wait for at least 3 minutes
before beginning work.
|
| 2. |
Remove the front seat assembly.
(Refer to Body - "Front Seat Assembly")
|
| 3. |
Remove the front seat back cover.
(Refer to Body - "Front Seat Back Cover")
|
| 4. |
Remove the side airbag from the seat back after loosening the mounting
nut.
|
| Installation |
|
| 1. |
Remove the ignition key from the vehicle.
|
| 2. |
Disconnect the battery negative cable and wait for at least three minutes.
|
| 3. |
Disconnect the battery negative cable and wait for at least three minutes.
|
| 4. |
Install the side airbag.
|
| 5. |
Install the front seat back cover.
(Refer to Body - "Front Seat Back Cover")
|
| 6. |
Install the front seat assembly.
(Refer to Body - "Front Seat Assembly")
|
| 7. |
Recline and slide the front seat forward fully, make sure the harness
wires are not pinched of interfering with other parts.
|
| 8. |
Reconnect the battery negative cable.
|
| 9. |
After installing the side airbag (SAB), confirm proper system operation
:
|
 Curtain Airbag (CAB) Module. Description and operation
Description
Curtain airbags are installed inside the headliner (LH and RH) and protect the
driver and passenger from danger when side crash occurs...
Other information:
Hyundai Venue (QX) (2020-2025) Owners Manual: Cruise Control
Cruise Control Operation 1. Cruise indicator 2. SET indicator The Cruise Control system allows you to drive at speeds above 20 MPH (30 km/h) without depressing the accelerator pedal. WARNING Take the following precautions: Always set the vehicle speed under the speed limit...
Hyundai Venue (QX) (2020-2025) Service Manual: Inhibitor Switch. Specifications
..
Categories
- Manuals Home
- 1st Generation Venue Owners Manual
- 1st Generation Venue Service Manual
- Theft-Alarm System
- Immobilizer System
- Type B, C
- New on site
- Most important about car
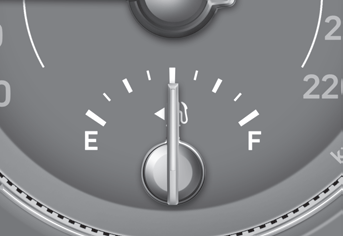
Fuel gauge

This gauge indicates the approximate amount of fuel remaining in the fuel tank.
Information
The fuel tank capacity is given in chapter 2. The fuel gauge is supplemented by a low fuel warning light, which will illuminate when the fuel tank is nearly empty. On inclines or curves, the fuel gauge pointer may fluctuate or the low fuel warning light may come on earlier than usual due to the movement of fuel in the tank.
Copyright © 2025 www.hvenueqx.com


