Hyundai Venue: Rear Door / Repair procedures
Hyundai Venue (QX) (2020-2025) Service Manual / Body (Interior and Exterior) / Rear Door / Repair procedures
| Adjustment |
Glass Adjustment
|

| 1. |
Remove the rear door trim.
(Refer to Rear Door - "Rear Door Trim")
|
| 2. |
Remove the plug hole (A).
|

| 3. |
Loosen the glass mounting bolts, adjust the spacing of the glass (A)
by moving the glass from side to side and then tighten the bolts.
|

Door Striker Adjustment
|

| 1. |
Loosen the mounting bolts, adjust the striker (A) by moving it forward
and backward or from side to side and then tighten the bolts (B).
|

| 2. |
Tap on the striker with a plastic hammer to adjust the striker. The
striker will not move much, but will give some adjustment.
|
| 3. |
Hold the outer handle out, and push the door against the body to be
sure the striker allows a flush fit. If the door latches properly, tighten
the screws and recheck.
|
Door Position Adjustment
|

| 1. |
Check that the door and body edges are parallel.
|

| 2. |
Place the vehicle on a level surface before adjusting the doors.
|
| 3. |
Adjust the hinges (A) :
|

 Components and components location
Components
1. Rear door trim
2. Rear door module
3. Rear door hinge
4. Rear door inside weatherstrip
5. Rear door outside weatherstrip
6...

Other information:
Hyundai Venue (QX) (2020-2025) Service Manual: Fuel pressure test
Fuel Pressure Test 1. Release the residual pressure in fuel line. (Refer to Fuel Delivery System - "Release Residual Pressure in Fuel Line") • When removing the fuel pump fuse, a Diagnostic Trouble Code (DTC) may occur...
Hyundai Venue (QX) (2020-2025) Service Manual: Description and operation
Description • The oil pump is powered by the engine. ATF passes through the oil filter and gets distributed along the oil channels. • The oil becomes highly pressurized as it exits the oil pump and passes through the line pressure valve before being fed to the clutch & brake control valve, clutch, and brakes...
Categories
- Manuals Home
- 1st Generation Venue Owners Manual
- 1st Generation Venue Service Manual
- Theft-Alarm System
- Immobilizer System
- To set Cruise Control speed
- New on site
- Most important about car
Head Restraints
The vehicle’s front and rear seats have adjustable head restraints. The head restraints provide comfort for passengers, but more importantly they are designed to help protect passengers from whiplash and other neck and spinal injuries during an accident, especially in a rear impact collision.
WARNING
To reduce the risk of serious injury or death in an accident, take the following precautions when adjusting your head restraints:
Always properly adjust the head restraints for all passengers BEFORE starting the vehicle. NEVER let anyone ride in a seat with the head restraints removed or reversed.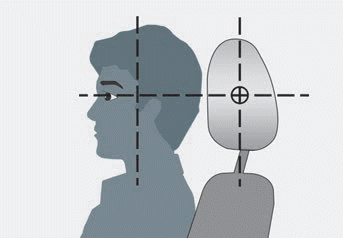

Copyright © 2025 www.hvenueqx.com