Hyundai Venue: Hydraulic System / Torque Converter Control Solenoid Valve (T/CON_VFS). Repair procedures
| • |
Refer to the DTC manual for the check procedure.
|
|
| • |
When the solenoid valve Diagnostic Trouble Codes (DTC) is on,
perform the following procedure to replace it.
|
| • |
Automatic transaxle is composed of delicate components. Be careful
not to cause any damage on the component in the course of assembly
and disassembly.
|
| • |
Maintain clean condition so that foreign substance does not
get into the automatic transaxle.
|
| • |
Use a coated apron, latex gloves, and stainless tray to prevent
foreign substance from getting into the transaxle.
|
| • |
Automatic transaxle fluid (ATF) can be reused. Collect it using
a clean 10-liter beaker.
|
|
| 1. |
Turn ignition switch OFF and disconnect the negative (-) battery cable.
|
| 2. |
Remove the air cleaner and air duct.
| (1) |
Remove the air duct (A).

|
| (2) |
Disconnect the breather hose (B) and air intake hose (C).
|
| (3) |
Remove the air cleaner assembly (D).
|
Tightening torque :
Hose clamp bolt (C):
2.9 - 4.9 N.m (0.3 - 0.5 kgf.m, 2.1 - 3.6 lb-ft)
Air cleaner assembly bolts (D) :
3.9 - 5.9 N.m (0.4 - 0.6 kgf.m, 2.9 - 4.3 Ib-ft)
|

|
|
| 3. |
Discharge the automatic transaxle fluid (ATF).
(Refer to Automatic Transaxle Syatem - "Automatic Transaxle Fluid (ATF)")
|
| 4. |
Disconnect the wiring fixing clip (A).
|
| 5. |
Disconnect the air bleeder hose (B).

|
| 6. |
Disconnect the ATF cooler hose (A).

| •
|
Be careful not to cause any damage on the hose when
tightening the clamp.
|
| •
|
Mount the clamp tightening part in the designated direction
so that interference does not occur with the adjacent
parts.
|
| •
|
After connecting the hose, check for oil leakage on
the connecting part while the engine is on.
|
|
|
| 7. |
Unscrew the bolts and then remove the valve body cover (A).
|
Tightening torque :
11.8 - 13.7 N.m (1.2 - 1.4 kgf.m, 8.7 - 10.1 lb-ft)
|


| •
|
When re-mounting the valve body cover, replace the gasket
with a new one.
|
| •
|
After mounting the valve body cover, check for oil leakage
on the connecting part while the engine is on.
|

|
|
| 8. |
Unscrew the bolts and then disconnect the solenoid valve connector (A).
|
Tightening torque :
9.8 - 11.8N.m (1.0 - 1.2 kgf.m, 7.2 - 8.7 lb-ft)
|

|
| 9. |
Remove the support bracket mounting bolt (A).
|
Tightening torque :
9.8 - 11.8 N.m (1.0 - 1.2 kgf.m, 7.2 - 8.7 lb-ft)
|

|
| 10. |
Remove the support bracket (A).
|
| 11. |
Loosen the bolt (B).
|
Tightening torque :
9.8 - 11.8 N.m (1.0 - 1.2 kgf.m, 7.2 - 8.7 lb-ft)
|

|
| 12. |
Remove the torque converter control solenoid valve (A).

|
| 1. |
To install, reverse the removal procedure.
|
| 2. |
Inject the automatic transaxle oil and inspect the oil level.
(Refer to Automatic Transaxle System - "Automatic Transaxle Fluid (ATF)")
| 1) |
After ATF level check or exchange, be sure to remove
residual ATF on transaxle case.
(Be especially sure to remove residual ATF between automatic
transaxle case and valve body cover)
|
| 2) |
After installing the valve body cover, make sure to
check the oil leakage at the connection area with the
engine ON.
|
|
|
| 3. |
Clear the diagnostic trouble codes (DTC) using the diagnostic tool.
| •
|
Even though disconnecting the battery negative terminal,
the DTCs will not be cleared. So, be sure to clear the
DTCs using the diagnostic tool.
|
|
|
| 4. |
In order to prevent start delay and gear shift shock during acceleration
and start, perform TCM learning after replacing the solenoid valve.
(Refer to Automatic Transaxle Control System - "Repair procedures")
|
Component Location (1)_Valve
Body Cover
1. Valve Body Cover
2. Valve Body Cover Gasket
3. Solenoid Valve Connector
Component Location (2)_Solenoid
Valve
1...
Description
•
26 brake control solenoid valve(26/B_VFS) is attached to the valve body.
•
This variable force solenoid valve directly controls the hydraulic pressure
inside the 26Brake...
Other information:
Inspection
1.
Troubleshooting for Speaker
(1)
Basic inspection of speaker
Inspect the sound from speaker after verifying that the speaker
mounting screws is removed and the wiring connector is connected
precisely to remove vibration transmitted from body trims and
surrounding parts...
..
Categories
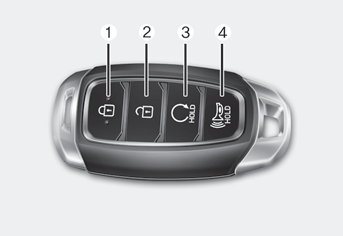
Your HYUNDAI uses a Smart Key, which you can use to lock or unlock the driver
and passenger doors or the rear liftgate.
1. Door Lock
2. Door Unlock
3. Remote start
read more


 Torque Converter Control Solenoid Valve (T/CON_VFS). Components and components
location
Torque Converter Control Solenoid Valve (T/CON_VFS). Components and components
location 26 Brake Control Solenoid Valve (26/B_VFS). Description and operation