Hyundai Venue: Manual Transaxle Control System / Shift Lever. Repair procedures
Hyundai Venue (QX) (2020-2025) Service Manual / Manual Transaxle System / Manual Transaxle Control System / Shift Lever. Repair procedures
| Removal |
| 1. |
Turn OFF ignition switch and disconnect the negative (-) battery cable.
|
| 2. |
Remove the shift lever knob & boots (A) pull both of it up.
|

| 3. |
Remove the floor console assembly.
(Refer to Body - "Floor Console")
|
| 4. |
Separate the clip (A) of wiring.
|

| 5. |
Separate the air duct (A) from the both side.
|

| 6. |
Remove the snap pin (A) and then separate the select cable (B).
|

| 7. |
Separate the cable socket (A) from the shift lever, after release the
lock.
|

| 8. |
Remove the shift lever.
|

| Installation |
| 1. |
To install, reverse the removal procedures.
|

 Shift Lever. Components and components location
Components
1. Shift lever knob & boots
2. Shift lever assembly
3. Select cable
4. Shift cable
5. Retainer
6...
 Control Cable. Components and components location
Components
1. Shift lever knob & boots
2. Shift lever assembly
3. Select cable
4. Shift cable
5. Retainer
6...
Other information:
Hyundai Venue (QX) (2020-2025) Service Manual: Smart Key Unit. Schematic diagrams
..
Hyundai Venue (QX) (2020-2025) Service Manual: SS-A Solenoid Valve (ON/OFF). Description and operation
Description • SS-A solenoid valve is attached to the valve body and is an on/off solenoid valve that is used to change gears. • SS-A Solenoid valve(ON/OFF) is installed at valve body...
Categories
- Manuals Home
- 1st Generation Venue Owners Manual
- 1st Generation Venue Service Manual
- Type B, C
- Remote Key
- Smart Key
- New on site
- Most important about car
Interior Overview
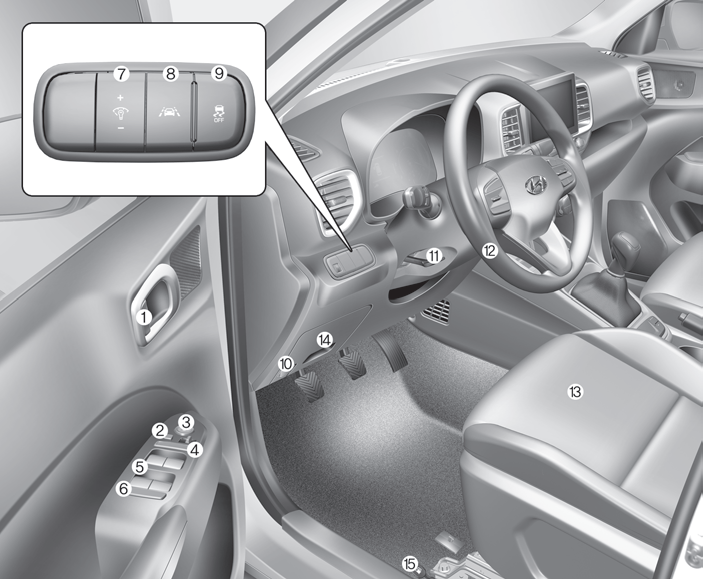
1. Door lock/unlock button
2. Outside rearview mirror control switch
3. Central door lock switch
4. Power window switches
5. Power window lock switch
Copyright © 2025 www.hvenueqx.com