Hyundai Venue: Windshield Glass / Repair procedures
Hyundai Venue (QX) (2020-2025) Service Manual / Body (Interior and Exterior) / Windshield Glass / Repair procedures
| Replacement |
[Removal]
|

|

| 1. |
Remove the roof side molding.
(Refer to Interior Trim - "Roof Side Molding")
|
| 2. |
Remove the inside rear view mirror assembly.
(Refer to Mirror - "Inside Rear View Mirror")
|
| 3. |
Remove the front pillar trim.
(Refer to Interior Trim - "Front Fillar Trim")
|
| 4. |
Remove the cowl top cover.
(Refer to "Cowl Top Cover")
|
| 5. |
Using a cutter (A) knife, carefully remove the windshield glass molding.
|


| 6. |
Cut off the sealant on the edge (B) while pulling the piano wire (A)
to the left and right.
|


| 7. |
Cut off the sealant on (A-A), (B-B), (C-C), while pulling a piano wire
(A) to the left and right.
|


| 8. |
Remove the windshield glass (B) carefully using the glass holder (A).
|

[Installtion]
| 1. |
Using a knife, scrape the remaining sealant around the body panel leaving
about 2mm-thick sealant (0.0079 in.) on the bonding surface. If installing
a new windshield glass, make alignment marks on the windshield glass
and the body.
|


| 2. |
Clean the edges of body panel and windshield glass with alcohol. Apply
glass primer to the edges of windshield glass.
|
| 3. |
Apply the body primer to the bonding surface of body panel.
|


| 4. |
Apply the glass primer to the outer edge of windshield glass.
|


| 5. |
Apply a bead of sealant (B) around the windshield glass (A).
|

| 6. |
Using the glass holder (A), adjust the windshield glass (B) to fit the
alignment marks (C) on the body and lightly push the windshield glass
to make the edges fully seated on the bonding surface of body.
|

| 7. |
To make sure that the applied sealant is completely hardened, leave
the car on a flat surface for at least 4 hours after installing the
windshield glass.
|

| 8. |
Conduct a leak testing.
|
| 9. |
Install the cowl top cover.
(Refer to "Cowl Top Cover")
|
| 10. |
Install the roof side molding.
(Refer to Interior Trim - "Roof Side Molding")
|
| 11. |
Install the inside rear view mirror assembly.
(Refer to Mirror - "Inside Rear View Mirror")
|
| 12. |
Install the front pillar trim.
(Refer to Interior Trim - "Front Pillar Trim")
|


Other information:
Hyundai Venue (QX) (2020-2025) Service Manual: Engine Coolant Temperature Sensor (ECTS). Description and operation
Description Engine Coolant Temperature Sensor (ECTS) is located in the engine coolant passage of the cylinder head for detecting the engine coolant temperature. The ECTS uses a thermistor whose resistance changes with the temperature...
Hyundai Venue (QX) (2020-2025) Owners Manual: Cargo Area Cover
Use the cover to hide items stored in the cargo area. The cargo area cover will lift when the liftgate is opened. Disconnect the strap (1) from the holder if you want to return the cover to the original position. To remove the cargo area cover completely, pull the cover backward and out from the rail...
Categories
- Manuals Home
- 1st Generation Venue Owners Manual
- 1st Generation Venue Service Manual
- Shift-lock system, Shift-lock release, Parking
- Vehicle Identification Number (vin), Vehicle Certification Label
- To set Cruise Control speed
- New on site
- Most important about car
Fuel gauge
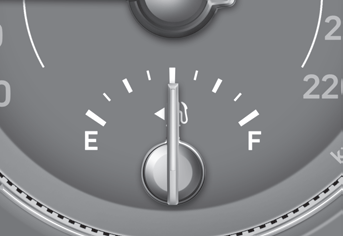
This gauge indicates the approximate amount of fuel remaining in the fuel tank.
Information
The fuel tank capacity is given in chapter 2. The fuel gauge is supplemented by a low fuel warning light, which will illuminate when the fuel tank is nearly empty. On inclines or curves, the fuel gauge pointer may fluctuate or the low fuel warning light may come on earlier than usual due to the movement of fuel in the tank.
Copyright © 2025 www.hvenueqx.com