Hyundai Venue: Trunk Trim / Repair procedures
Hyundai Venue (QX) (2020-2025) Service Manual / Body (Interior and Exterior) / Trunk Trim / Repair procedures
| Replacement |
|

| 1. |
Remove the rear seat assembly
(Refer to Rear Seat - "Rear Seat Assembly")
|
| 2. |
Carefully remove the rear door body side weatherstrip.
|
| 3. |
Carefully remove the tail gate weatherstrip.
|
| 4. |
Remove the rear door scuff trim.
(Refer to Interior Trim - "Door Scuff Trim")
|
| 5. |
Remove the rear transverse trim.
(Refer to Interior Trim - "Rear Transverse Trim")
|
| 6. |
Using a lfat-tip screwdriver and remove the luggage room lamp (A).
|

| 7. |
Separate the luggage lamp connector and remove the luggage room lamp
(A).
|

| 8. |
Loosen the mounting screws and remove the luggage side trim (A).
|

| 9. |
To install, reverse removal procedure.
|

 Components and components location
Components
1. Luggage side trim [LH]
2. Rear transverse trim
3. Luggage board assembly
4. Luggage side trim [RH]
5...

Other information:
Hyundai Venue (QX) (2020-2025) Service Manual: Underdrive Brake Control Solenoid Valve (UD/B_VFS). Specifications
Specifications Shape Items Specifications Control current (voltage) [mA] 0 - 1100 Supply pressure [kpa (kgf/cm², psi)] 1569.06 (16, 227...
Hyundai Venue (QX) (2020-2025) Service Manual: Specifications
Specification Item Resistance (Ω) Driver Airbag (DAB) 2.2 - 6.0 Passenger Airbag (PAB) 1.6 - 6.0 Side Airbag (SAB) 1.6 - 6...
Categories
- Manuals Home
- 1st Generation Venue Owners Manual
- 1st Generation Venue Service Manual
- Automatic Door Lock and Unlock Features
- Shift-lock system, Shift-lock release, Parking
- Warning and Indicator Lights
- New on site
- Most important about car
Instrument Panel Overview
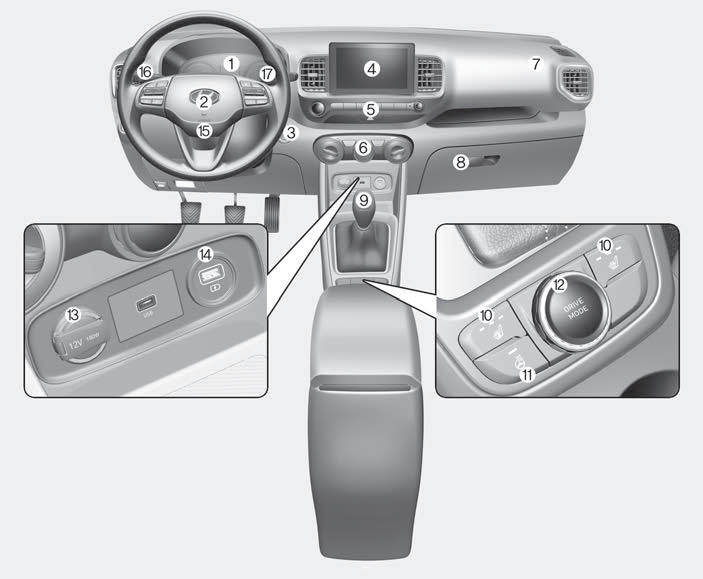
1. Instrument cluster
2. Horn
3. Key ignition switch/ Engine Start/Stop button
4. Infotainment system
5. Hazard warning flasher switch

Copyright © 2025 www.hvenueqx.com