Hyundai Venue: ESP(Electronic Stability Program) System / ESP Control Module. Repair procedures
Hyundai Venue (QX) (2020-2025) Service Manual / Brake System / ESP(Electronic Stability Program) System / ESP Control Module. Repair procedures
| Removal |
| 1. |
Turn ignition switch OFF and disconnect the negative (-) battery cable.
|
| 2. |
Remove the battery and battery tray.
(Refer to Engine Electrical System - "Battery")
|
| 3. |
In case of diesel vehicle, remove the fuel filter.
(Refer to Engine Control / Fuel System - "Fuel Filter")
|
| 4. |
Pull up the lock of the ABS control module connector and then disconnect
the connector (A).
|

| 5. |
Separate the brake tubes from the ABS by unlocking the nuts (6-ea) couterclockwise
using a spanner.
|


| 6. |
Loosen the ABS control module mounting nut (A) and then remove the ESP
control module from the vehicle.
|

| 7. |
Separate the bracket (B) after remove the mounting bolt from the ABS
control module (A).
|

| Installation |
| 1. |
To install, reverse the removal procedure.
|
| 2. |
Tighten the HECU mounting bolts and nuts to the specified torque.
|
| 3. |
After installation, bleed the brake system.
(Refer to Brake System - "Brake Bleeding Prcoedures")
|
| 4. |
Conduct the Variant coding.
|
| 5. |
Conduct the Auto Detected Sensor Calibration.
|
| 6. |
Conduct the Longitudinal G Sensor Calibration.
|
| Adjustment |
Diagnosis procedure by using diagnostic device
As manual for diagnosis methods by using diagnosis device, the main contents
are as follows :
Connect self-diagnosis connector (16pins) located in the lower of driver side
crash pad to self-diagnosis device, and then turn the self-diagnosis device
after key is ON.
Select the "vehicle model" and "ABS/ESC" on diagnostic tool vehicle selection
screen, then select OK.
[Variant Code Reset]


[Auto Detected Sensor Calibration]


[Longitudinal G Sensor Calibration]


 ESP Control Module. Components and components location
Components
1. Front - right tube
2. Rear - left tube
3. Rear - right tube
4. Front - left tube
5. MC SEC
6...

Other information:
Hyundai Venue (QX) (2020-2025) Service Manual: Overdrive Clutch Control Solenoid Valve (OD/C_VFS). Repair procedures
Inspection • Refer to the DTC manual for the check procedure. Removal • When the solenoid valve Diagnostic Trouble Codes (DTC) is on, perform the following procedure to replace it...
Hyundai Venue (QX) (2020-2025) Owners Manual: Check Tire Inflation Pressure
Check your tires, including the spare tire, once a month or more. How to check Use a good quality tire pressure gauge to check tire pressure. You can not tell if your tires are properly inflated simply by looking at them. Radial tires may look properly inflated when they are underinflated...
Categories
- Manuals Home
- 1st Generation Venue Owners Manual
- 1st Generation Venue Service Manual
- To set Cruise Control speed
- Operating Door Locks from Outside the Vehicle
- Warning and Indicator Lights
- New on site
- Most important about car
Interior Overview
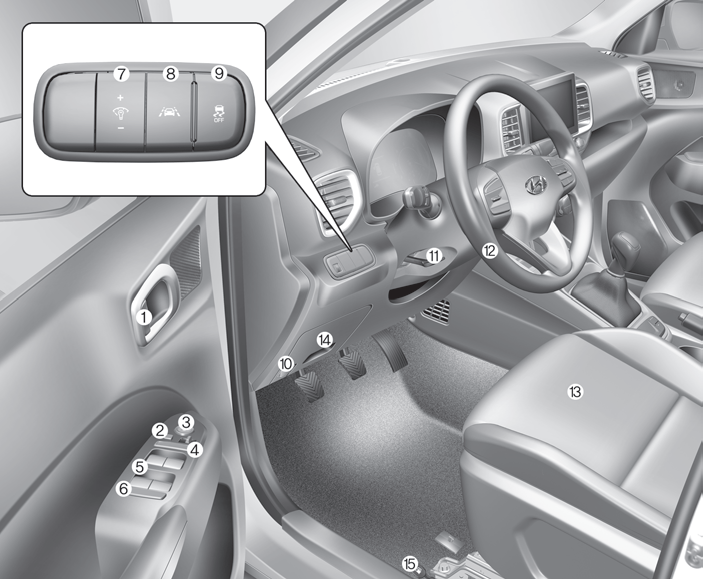
1. Door lock/unlock button
2. Outside rearview mirror control switch
3. Central door lock switch
4. Power window switches
5. Power window lock switch

Copyright © 2025 www.hvenueqx.com