Hyundai Venue: Automatic Transaxle Control System / Transaxle Oil Temperature Sensor. Repair procedures
| • |
When Diagnostic Trouble Codes (DTC) is on, perform the following
procedure to replace it.
|
| • |
Automatic transaxle is composed of delicate components. Be careful
not to cause any damage on the component in the course of assembly
and disassembly.
|
| • |
Maintain clean condition so that foreign substance does not
get into the automatic transaxle.
|
| • |
Use a coated apron, latex gloves, and stainless tray to prevent
foreign substance from getting into the transaxle.
|
| • |
Automatic transaxle fluid (ATF) can be reused. Collect it using
a clean 10-liter beaker.
|
|
| 1. |
Turn ignition switch OFF and disconnect the negative (-) battery cable.
|
| 2. |
Remove the air cleaner and air duct.
| (1) |
Remove the air duct (A).

|
| (2) |
Disconnect the breather hose (B) and air intake hose (C).
|
| (3) |
Remove the air cleaner assembly (D).
|
Tightening torque :
Hose clamp bolt (C):
2.9 - 4.9 N.m (0.3 - 0.5 kgf.m, 2.1 - 3.6 lb-ft)
Air cleaner assembly bolts (D) :
3.9 - 5.9 N.m (0.4 - 0.6 kgf.m, 2.9 - 4.3 Ib-ft)
|

|
|
| 3. |
Remove the battery (+) terminal (A).
|
Tightening torque :
7.8 - 9.8 N.m (0.8 - 1.0 kgf.m, 5.8 - 7.2 lb-ft)
|

|
| 4. |
Remove the battery mounting bracket (A) and the battery (B).
|
Tightening torque :
9.0 - 14.0 N.m (0.9 - 1.4 kgf.m, 6.6 - 10.3 Ib-ft)
|

|
| 5. |
Remove the ECM.
| (1) |
Disconnect the ECM connector (A).
|
| (2) |
Loosen the mounting bolts (B) and then removing the ECM bracket
assembly.
|
|
Tightening torque :
9.8 - 11.8 N.m (1.0 - 1.2 kgf.m, 7.2 - 8.7 lb-ft)
|

|
| 6. |
Remove the battery tray.
| (1) |
Loosen the mounting bolt (A) and then removing the battery (+)
terminal bracket.
|
Tightening torque :
8.0 - 10.0 N.m (0.8 - 1.0 kgf.m, 5.9 - 7.4 lb-ft)
|

|
| (2) |
Loosen the bolts and then removing the battery tray (A).
|
Tightening torque :
8.8 - 13.7 N.m (0.9 - 1.4 kgf.m, 6.5 - 10.1 Ib-ft)
|

|
|
| 7. |
Remove the drain plug (A) and drain the ATF totally and then reinstall
the drain plug.

| •
|
Replace the gasket before reinstalling the drain plug.
|
| •
|
After the installation, start the engine and then check
if there are any leakages from the drain plug.
|
|
|
| 8. |
Remove the wiring mounting clip (A).
|
| 9. |
Disconnect the air breather hose (B) from the valve body cover.
|
Tightening torque :
9.8 - 11.8 N.m (1.0 - 1.2 kgf.m, 7.2 - 8.7 lb-ft)
|

|
| 10. |
Disconnect the hose (A) after removing the automatic transaxle fluid
cooler hose clamp.

| •
|
Carefully install the clamp not to damage the hose.
|
| •
|
Install the clamp in a correct direction not to be interfered
with other parts.
|
| •
|
After the installation, start the engine and then check
if there are any leakages from the hose.
|
|
|
| 11. |
Remove the valve body cover (A).
|
Tightening torque :
11.8 - 13.7 N.m (1.2 - 1.4 kgf.m, 8.7 - 10.1 lb-ft)
|


| •
|
Replace the gasket (A) before reinstalling the valve
body cover.

|
| •
|
After the installation, start the engine and then check
if there are any leakages from the valve body cover.
|
|
|
| 12. |
Disconnect the oil temperature sensor and solenoid valve connector (A)
from the valve body.
|
Tightening torque :
9.8 - 11.8 N.m (1.0 - 1.2 kgf.m, 7.2 - 8.7 lb-ft)
|

| •
|
Check for the looseness, poor connection, bending, corrosion,
contamination, deterioration, or damage before reinstalling
the solenoid valve connector.
|
|
|
| 13. |
Remove the valve body assembly (A).
|
Tightening torque :
9.8 - 11.8 N.m (1.0 - 1.2 kgf.m, 7.2 - 8.7 lb-ft)
|

|
| 14. |
Disconnect the input & output speed sensor connector (A).

|
| 15. |
Loosen the main connctor bolt (A).
|
Tightening torque :
9.8 - 11.8 N.m (1.0 - 1.2 kgf.m, 7.2 - 8.7 lb-ft)
|

|
| 16. |
Disconnect the solenoid valve connector (A).

|
| 17. |
Remove the solenoid valve connector mounting clip (A).

|
| 18. |
Remove the solenoid valve connector (A) by pushing down from the transaxle.

| •
|
Replace the O-Ring (A) before reinstalling solenoid
valve connector.

|
|
|
| 1. |
To install, reverse the removal procedure.
|
| 2. |
Check fluid level, after filling the automatic transaxle with fluid.
(Refer to Automatic Transaxle Syatem - "Automatic Transaxle Fluid (ATF)")
|
Specifications
▷ Type : Negative Thermal Coefficient Type
Temp.[(°C)°F]
Resistance (Ω)
Min
Max
(-40) -40
48153
45301
51006
(-20) -4...
Description
Input speed sensor is a vital unit that measures the rate of rotation of the
input shaft inside the transaxle and delivers the readings to the TCM...
Other information:
Blade type fuse
Cartridge type fuse
1. Turn the engine off.
2. Turn all other switches OFF.
3. Remove the fuse panel cover by pressing the tap and pulling up.
4. Check the removed fuse; replace it if it is blown. To remove or insert the
fuse, use the fuse puller in the engine compartment fuse panel...
..
Categories
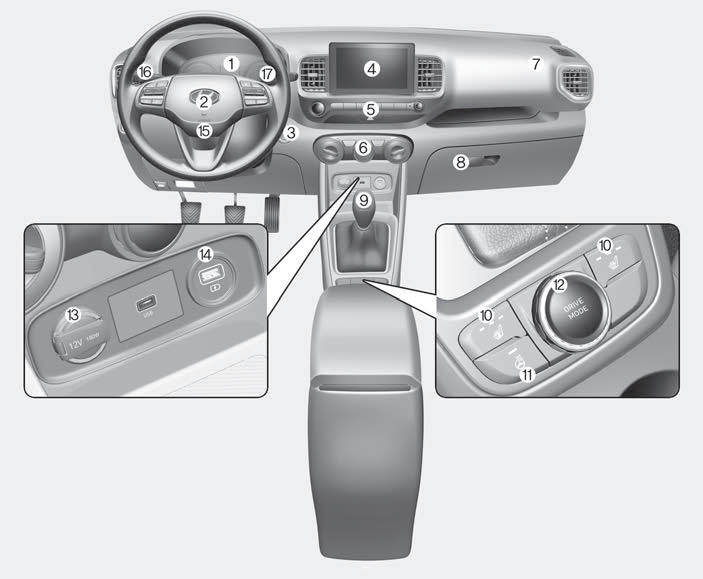
1. Instrument cluster
2. Horn
3. Key ignition switch/ Engine Start/Stop button
4. Infotainment system
5. Hazard warning flasher switch
read more


 Transaxle Oil Temperature Sensor. Specifications
 Input Speed Sensor. Description and operation