Hyundai Venue: Rear Seat / Rear Seat Back Cover. Repair procedures
Hyundai Venue (QX) (2020-2025) Service Manual / Body (Interior and Exterior) / Rear Seat / Rear Seat Back Cover. Repair procedures
| Replacement |
| [LH] |
|

| 1. |
Remove the rear seat assembly [RH].
(Refer to Rear Seat - "Rear Seat Assembly")
|
| 2. |
Push the lock pins, and remove the rear seat headrest (A).
|

| 3. |
Loosen the mounting screw and remove the rear seat folding cover (A).
|

| 4. |
Using a remover and remove the rear seat back latch cover (A).
|

| 5. |
Remove the protector (A).
|

| 6. |
Zip off the rear seat back cover (A), and then pull it up.
[RH]
[LH]
|


| 7. |
Using a remover and remove the cap (A).
|

| 8. |
Separate the hog-ring clips, protector (A) and remove the rear seat
back board (B).
|

| 9. |
Pull out the rear seat headrest guides (A) while pinching both sides
of the lower part of the guides, and remove them.
|


| 10. |
Remove the rear seat back frame (A).
|

| 11. |
After removing the hog-ring clips (A) inside the rear seat back cover,
remove the seat back cover (B).
|

| 12. |
To install, reverse removal procedure.
|


| [RH] |
|

| 1. |
Remove the rear seat assembly [LH].
(Refer to Rear Seat - "Rear Seat Assembly")
|
| 2. |
Push the lock pins, and remove the rear seat headrest (A).
|

| 3. |
Loosen the mounting screw and remove the rear seat folding cover (A).
|

| 4. |
Using a remover and remove the rear center seat belt cover (A).
|

| 5. |
Using a remover and remove the rear seat back latch cover (A).
|

| 6. |
Remove the protector (A).
|

| 7. |
Zip off the rear seat back cover (A), and then pull it up.
[RH]
[LH]
|


| 8. |
Separate the hog-ring clips, protector (A) and remove the rear seat
back board (B).
|

| 9. |
Using a remover and remove the cap (A).
|

| 10. |
Pull out the rear seat headrest guides (A) while pinching both sides
of the lower part of the guides, and remove them.
|


| 11. |
Remove the rear seat back frame (A).
|

| 12. |
After removing the hog-ring clips (A) inside the rear seat back cover,
remove the seat back cover (B).
|

| 13. |
To install, reverse removal procedure.
|


Other information:
Hyundai Venue (QX) (2020-2025) Service Manual: Specifications
Specifications Front Suspension Item Specification Suspension type MacPherson Strut Shock absorber Type General Valve Rear Suspension Item Specification Suspension type Couple Torsion Beam Axle Shock absorber Type General Valve Wheel & Tire Item Specification Wheel Steel 6...
Hyundai Venue (QX) (2020-2025) Service Manual: Compressor. Description and operation
Description The compressor is the power unit of the A/C system. It is located on the side of engine block and driven by a V-belt of the engine. The compressor changes low pressure and low temperature refrigerant gas into high pressure and high temperature refrigerant gas...
Categories
- Manuals Home
- 1st Generation Venue Owners Manual
- 1st Generation Venue Service Manual
- Electronic Stability Control (ESC)
- Type B, C
- Lighting control
- New on site
- Most important about car
Instrument Panel Overview
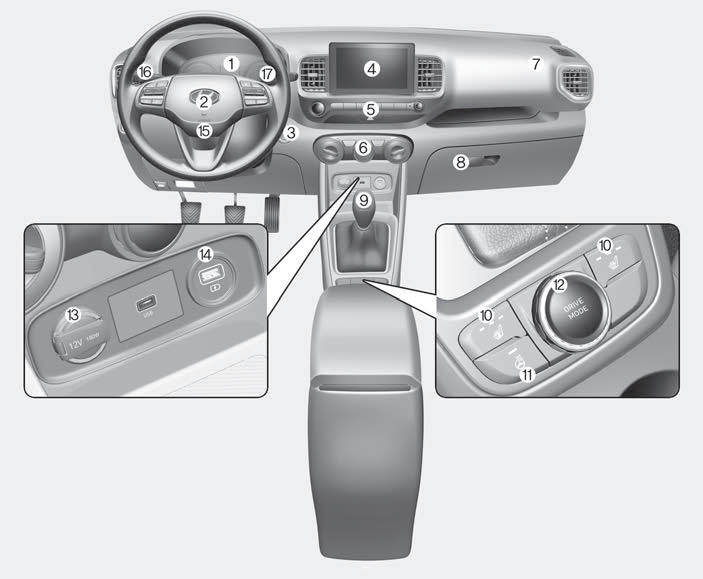
1. Instrument cluster
2. Horn
3. Key ignition switch/ Engine Start/Stop button
4. Infotainment system
5. Hazard warning flasher switch

Copyright © 2025 www.hvenueqx.com