Hyundai Venue: Rear Bumper / Rear Bumper Cover. Repair procedures
Hyundai Venue (QX) (2020-2025) Service Manual / Body (Interior and Exterior) / Rear Bumper / Rear Bumper Cover. Repair procedures
| Replacement |
|

| 1. |
Loosen the mounting screws and remove the rear combination lamp (A).
|

| 2. |
Press the lock pin and separate the rear combination lamp connector
(A).
|

| 3. |
Loosen the mounting clip and screw.
|

| 4. |
Loosen the mounting clips and screws on the side of rear bumper (A),
detach the side part of rear bumper.
|


| 5. |
Loosen the mounting clips, nuts and remove the rear side under cover
(A).
|

| 6. |
Press the lock pin and separate the rear bumper main connector (B).
|
| 7. |
Loosen the mounting bolts and remove the rear bumper cover (A).
|

| 8. |
To install, reverse removal procedure.
|


Other information:
Hyundai Venue (QX) (2020-2025) Service Manual: Power Window Motor. Components and components location
..
Hyundai Venue (QX) (2020-2025) Service Manual: Immobilizer Control Unit. Repair procedures
Removal 1. Disconnect the negative (-) battery terminal. 2. Remove the glove box. (Refer to Body - "Glove Box Housing") 3. Remove the smart key unit (A) after loosening the nuts...
Categories
- Manuals Home
- 1st Generation Venue Owners Manual
- 1st Generation Venue Service Manual
- Vehicle Identification Number (vin), Vehicle Certification Label
- Remote Key
- Theft-Alarm System
- New on site
- Most important about car
Instrument Panel Overview
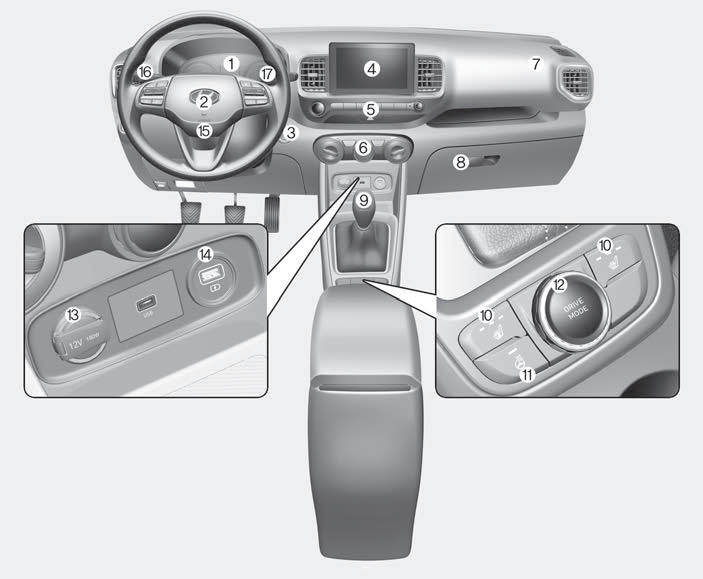
1. Instrument cluster
2. Horn
3. Key ignition switch/ Engine Start/Stop button
4. Infotainment system
5. Hazard warning flasher switch

Copyright © 2025 www.hvenueqx.com