Hyundai Venue: Intake And Exhaust System / Muffler. Repair procedures
Hyundai Venue (QX) (2020-2025) Service Manual / Engine Mechanical System / Intake And Exhaust System / Muffler. Repair procedures
| Removal and Installation |
[Front Muffler]
| 1. |
Remove the engine cover.
|
| 2. |
Disconnect the battery negative terminal.
|
| 3. |
Disconnect the oxygen sensor connector (A).
|

| 4. |
Remove the heat protector (A).
|

| 5. |
Remove the front muffler (A).
|

| 6. |
Install in the reverse order of removal.
|

[Center Muffler]
| 1. |
Disconnect the battery negative terminal.
|
| 2. |
Remove the center muffler assembly (A).
|
| 3. |
Install in the reverse order of removal.
|

[Rear Muffler]
| 1. |
Disconnect the battery negative terminal.
|
| 2. |
Remove the rear muffler assembly (A).
|

| 3. |
Install in the reverse order of removal.
|

Replacement procedure of center muffler using clamp
Under warranty : Replace the center muffler assembly.
Out of warranty : It is available to replace the center muffler as the procedure
below.
| 1. |
Check that the clamping part of the center muffler assembly is damaged
or deformed.
If the muffler is too corroded to clamp, replace the center muffler
assembly.
|

| 2. |
Record the gap (A, B, C, D, E, F) between the tail pipe (or tail trim)
and the rear bumper.
[Pipe type]
[Trim type]
[Bumper-integrated trim type]
|


| 3. |
Remove the catalytic converter & center muffler (A).
|

| 4. |
Cut the center muffler as the instruction below.
[With dent]
[Without dent]
[A/S muffler]
|
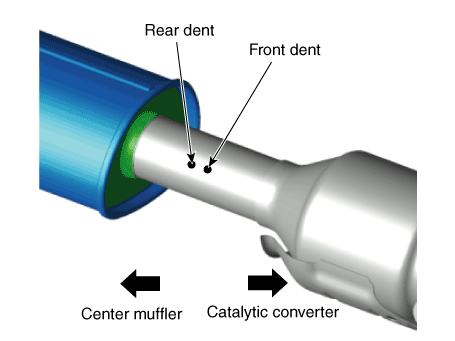


| 5. |
Install the center muffler.
|


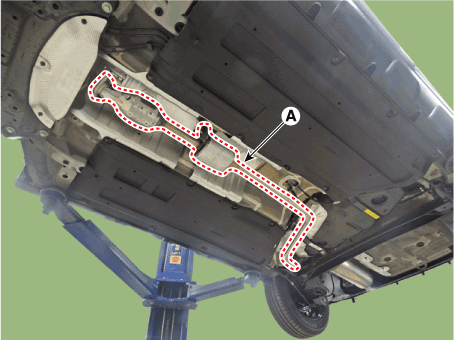
 Muffler. Components and components location
Components
1. Front muffler
2. Catalytic converter & center muffler assembly
3. Rear Muffler
4. Hanger
5...

Other information:
Hyundai Venue (QX) (2020-2025) Service Manual: Fender Garnish. Repair procedures
Replacement • Put on gloves to prevent hand injuries. • When removing with a flat-tip screwdriver or remover, wrap protective tape around the tools to prevent damage to components...
Hyundai Venue (QX) (2020-2025) Service Manual: Seat Heater Switch. Components and components location
..
Categories
- Manuals Home
- 1st Generation Venue Owners Manual
- 1st Generation Venue Service Manual
- Remote Key
- Warning and Indicator Lights
- Smart Key
- New on site
- Most important about car
Instrument Panel Overview
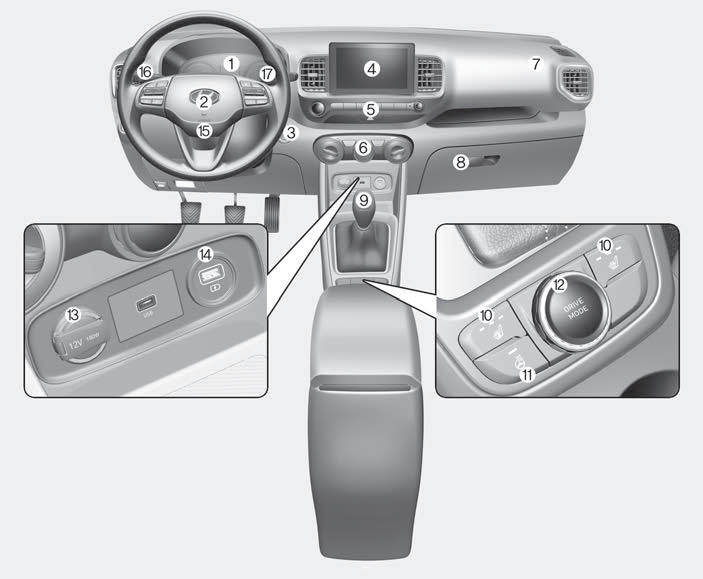
1. Instrument cluster
2. Horn
3. Key ignition switch/ Engine Start/Stop button
4. Infotainment system
5. Hazard warning flasher switch

Copyright © 2025 www.hvenueqx.com